Making Foundation by Hand
Making Foundation by Hand
The Way Back to Biological Beekeeping, Part 14
Recycling one’s own beeswax into foundation is not hard. It is the other side of off-season maintenance of woodenware supers, frames, tops and bottoms. After all, once you make the woodenware, don’t beekeepers need something to put into it, and there is nothing wrong with homemade. Homemade lets beekeepers know what their own beeswax purity is, besides letting them know they did right by their bees biologically without the use of harsh chemicals, antibiotics, and essential oils, or artificial feed, to produce a quality food safe product for their own personal use or sale.
EQUIPMENT FOR MAKING FOUNDATION: Since equipment for making foundation is currently not sold on the market, other than foundation mills, beekeepers will have to make their own which really is not hard. Three vats will be required: 1) one for dipping wax sheets, 2) one for holding dipping boards, and 3) one for melting a steady supply of wax. 4) Also, required will be pine dipping boards, and 5) a hot-box for warming wax sheets.
MAKING EQUIPMENT: Vats for dipping and melting wax are double vats made by using 15 gallon barrels 27″ high x 14.5 – 15″ wide tops, with 7.5 – 8 gallon smaller barrels mounted inside 20 -22″ high x 10″ wide tops. Use an electric immersion heater mounted in the side of the 15 gallon barrels near the bottom. (Walter T. Kelly sells electric immersion heaters, supplied with 1″ pipe threads, thermostat controlled with graduated off-on switch adjustable from 60 – 250 degrees F with 4 foot capillary tube which can easily be connected with 12-ga. wire) Over top of the immersion heater a shallow stand approximately 5″ high needs to be used to support the smaller 7.5 – 8 gallon inner barrel. The inner barrels will need tight fitting metal lids (ideally – the original that were made for the barrels to close), to use during heating/setting overnight, to alleviate condensation of moisture into the wax there contained. Make the 5″ stand from a metal 5 gallon bucket by cutting off the bottom 5″ with a metal cutting blade. Cut a rectangular cutout to allow placing the stand over the heating element approximately 4″ x 4″. Then punch a series of holes at roughly 1″ intervals around both sides of the welded bottom circular seam with a series of smaller circles punched on the circular bottom itself to allow air to escape from heating the water in the jacket in the vats. Simple lids for the double vats can be made from plywood with handles, with an under coating of aluminum coated stiff insulating foam, to help retain heat when the double vats are turned off at night. Around the outside of the double vats a simple hot-water heater jacket can be used to retain heat and also thus lower heating costs. Recommend 220 vs. 110 voltage also as an economy measure.
ALTERNATE USE FOR DOUBLE VATS: If inner smaller barrels are stainless steel (can be found if one looks around) the double vats can also be used for making long taper candles, besides foundation base which can also be used to make candles, when your own hive foundation needs are met. Also beekeepers could use for bulk pouring of wax ornaments for sale, as rubber molds are relatively easy and inexpensive to make, verses buying them.
Beekeepers might want to make extra outer vats from 15 gallon barrels with immersion heater elements mounted within, for use in recycling combs from culled frames. The wax would be accumulated as a combination wax/slum block for further processing. The wooded frames could be easily scraped clean in the hot bath for further soaking later in large lots for further decontamination if necessary. Remove wax with cocoons, pollen, etc with a metal sieve made from a wide-top shallow can with holes punched in a bottom corner to allow water to drain-out, then wax/slum is dumped in pans to accumulate until fill. When sufficient pans or blocks of salvaged wax/slum are gathered, then process in a Kelly wax press with decontamination processing if necessary. Upon completion, either further process into foundation, candles or sell.
MAKING EQUIPMENT: A hot-box for warming wax sheets in stacks can easily be made from an old refrigerator, that is gutted inside with the exception of the shelves, which will be used for holding sheets of foundation (could also be used for liquefying honey in various sized containers). Inside on the floor of the refrigerator place a fan forced electric heavy-duty space heater that has been linked into an automatic thermostat with settings between 60 – 150 degrees F., with dial settings mounted on the outside. Wax will be warmed using temperatures between 100 -110 degrees F approximately (use a setting of approximately 120 degrees F to liquefy honey slowly in containers without over heating to preserve natural vitamins and minerals). Remember to key the automatic thermostat to key readings of temperature to the middle shelve of the inside box (top shelf will then register automatically slightly higher and bottom shelf will then register automatically slightly lower, with thermometers being placed on each shelf.)
Dipping boards for making wax sheets should be made from single-ply pine boards and measure 9″ x 16 1/2″ long, with as few knots as possible. If knots are unavoidable, make sure they are real tight knots that will not come loose later on with successive soaking and dipping, sanding, etc. Recommend having a minimum of 3-4 pine dipping boards on hand at all times.
MISCELLANEOUS EQUIPMENT: Other equipment to have on hand for use in making foundation is 1) an instant hot-water maker pot, 2) a paper-cutter for making sheets of paper to put in between sheets of stacked wax, 3) round pizza-cutter, 4) thin masonite boards cut to size foundation wanted, i.e. 8″ x 16 1/2″, 4″ x 16 1/2″, 9″ x 16 1/2″, etc., 5) flat cutting station or cutting board for foundation, 6) plastic-bristle scrub brush for cleaning foundation mill surface, 7) roll of 30 x 36 plastic garbage baggies, and 8) phosphate free biodegradable ingredient liquid lemon-scent dish soap.
DIPPING WAX INTO USABLE SHEETS: If beekeepers are making foundation for their own personal use, it is not necessary to have yellow wax to make foundation with. In fact, we have found that the darker grades of wax foundation are more readily accepted by the bees than lighter wax grades and mill easier into foundation. We believe that the difference is the propolis content which gives the wax foundation better strength and ductility. (Note: Proper warming and cooling of wax sheets also helps to give foundation better ductility)
Prior to dipping wax sheets for foundation, the two double-vats of wax are heated and liquefied overnight to be ready the following morning. The double-vat to be used for melting wax, to have on hand a continuous supply of dipping wax, is heated to 190 degrees F and held at that temperature. Beekeepers will find that by doing this, following completion of the first days dipping and turning off the wax vat at night, by having the vat insulated so that it will not lose too much heat, the vat to some degree will act as a clarifying tank at night and give impurities within the wax (mostly dirt suspended) a chance to settle to the bottom of the container (many times you will find the mornings wax lighter in color than the afternoon/evening before when you stopped for the day). Periodically drain or dump the wax out of this inner vat into wax pans (every 2-3 months). Let solidify and scrape underside of wax cakes to remove dirty residue accumulation (also to remove any inadvertent water accumulation, from a loose fitting cover on the inner wax vat, during heating, etc). Further clean out the bottom of the wax vat as a fine slum of dirty wax residue will accumulate there. Reprocess the dirty slum residue in burlap sacks, to reclaim wax contained or throw out. Each morning prior to dipping foundation, figure on turning on the wax vats approximately 2 – 3 hours ahead of the actual process of dipping wax for foundation, so everything is liquid again prior to starting the days work.
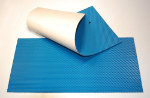
The double-vat to be used for dipping wax should be heated to between 165 – 180 degrees F, depending upon the actual climatic temperature outside (time of the year). The operation of making wax sheets is simply the dipping of a 9″ x 18″ single-ply pine board, pre-sanded and smooth, into a deep vessel of melted wax (When buying wood for dipping boards try to find center-cut or heart wood boards with the gain of the wood centered as much as possible. These type boards will hardly warp and the grain is not as liable to fray, peel or split catching the wax sheets as they are being peeled off). Prior to dipping, the board is sanded smooth and soaked for about 1 hour (15 gallon barrel filled with water), in water-vat barrel for dipping boards, and after each dip into the dipping wax-vat. A film of wax will adhere to the board, which after the last dip into the water-vat is peeled off, after the sides are cut-off all around the board with a blunt straight knife, exposing the two sheets dipped (one on each side of the board.)
Here, with experience, beekeepers dipping wax must learn to feel and recognize their wax as to how it is acting. The wax in the dipping vats if too cold will leave little ripples (waves) on the sheets dipped on each side of the board and the sheets will be wavy with irregular thickness bottom to top. If the wax gets cooled too fast in the water vat, it can crack apart in a fast line across the dipping board. If the dipping board is too bluntly (hits the water flat rather than correctly slightly angled about 5%), too fast, fed into the dipping-vat of wax, the dipped sheets of wax will not adhere properly to the dipping board and then when first dipped into the water-vat, can explode the wax sheets off of the dipping board or rip them apart. The dipping boards must be dipped straight (horizontal while holding) and held straight (horizontal while holding) after each successive dip into the dipping tank, before immersing again, to allow all the wax ripples to flow smoothly off the dipped board back into the dipping-vat without creating waves or lines across the wax, that when milled later on will create a non-uniform thickness in the foundation sheets made. Or in other words, the boards must be held straight when draining fresh dipped wax, so that the wax does not flow to either the right or left side of the dipped sheet. (Note: As the smooth ripples form and the wax flows, draining, a grain within the wax is created, like a grain within wood. If too much either right or left, then the sheet of wax created, when fed into the mill may not mill straight in its path, which could create unwanted milling problems later on.)
Beekeepers must recognize that the temperature of the wax, and the quickness of the plunge of the dipping board with its angle of projectory, just like the temperature outside, and the adjustment of the mill later on, all have their influence upon the finished product, namely the foundation being made. Further, many beekeepers will find, it may be an advantage to reverse the dipping board end with each dip and do a two-ply dip, to create an evenly made sheet of wax at a higher temperature of wax (180 degrees F), rather than dip the board once and have the sheet thicker on one end than the other (165 degrees F), or dip the board once, with a second fast dip on the opposite end to even just the opposite 3-4 inches of the wax sheet (165 degrees F). This repeat dipping and rotation of the dipping board becomes even more important when even more layers of wax are added to the dipped sheets, for those beekeepers who want thick sheets of wax run through adjustable-thickness mills for easier wire embedding later on into frames.
(Note: Though this might be easier foundation for beekeepers to embed, it really is a waste of wax to the bees, and is a disadvantage in decontamination procedures, because whenever the base of the cells is made thicker than the bees make it, they will rarely take the trouble to thin it down; but, no matter how thick the cell-wall, they will thin it down to nearly or the same thickness as the natural feral. What this means is, that if you have just lowered your contamination level of residues down within the wax by processing, and intend to keep bees with no further doping of chemicals, beekeepers really need to run the sheets thin, so that more fresh uncontaminated wax is drawn-out by the bees, thus lowering the overall contamination level, i.e. 90% new wax should be the goal here. Further, by milling thinner and not attempting to load the mill to the hilt, in the processing, thus getting less cell walls to match the old diamond-match pattern of the early part of this (1900) century, the bees will have a better chance of adapting 4.9mm foundation to either slightly smaller or slightly bigger, to acclimatize the bees better to their own local geographic area without the restraints of the cell walls, that act to artificially keep big bees bigger without breaking wax pattern, when drawing the wax base out. Further, by bees having to thin the cells walls thinner, you are in actuality creating even bigger inside cell diameters, which will only enhance the varroa and tracheal mite problem with still slightly larger bees yet.)
Following dipping, stack sheets of warm wax, peeled off dipping board (after cutting around sides of board with knife), neatly on another board or plate, by layering between sheets of pre-cut paper so that the wax sheets do not stick together. The neater the stacks, the better warmth will be retained within the stack of dipped sheets of wax. This is very important! The longer the wax sheets stay warm, the easier they are to mill, if milling into foundation right away. Further, the longer it takes for the wax sheets to cool if left alone to set on a shelf, the greater the ductility of the sheets will be on handling. Ductility of the wax sheets must be maintained throughout the whole process from beginning to end!
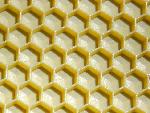
MILLING WAX INTO USABLE FOUNDATION: Milling foundation by hand is not hard and is accomplished by placing warmed sheets of wax into a sleeve of plastic so that NO STRETCHING of the foundation takes place in any direction, DISTORTING THE CELL SIZE, while lowering the concentration of release agent used. (It also helps to break in a new machine not seasoned to constant milling.) Every time a sheet of wax is fed through the foundation mill, a water-bath with a 2% bio-degradable mild soap-suds must be used to keep the wax from sticking while also acting to keep the mill rollers seasoned (Note: wax contains minute amounts of acid which act on the metal rollers to make them stick). If sheets of wax fed through the foundation mills are not sleeved, GREAT CARE MUST BE TAKEN NOT TO STRETCH THE FOUNDATION THUS GIVING A DISTORTED CELL SIZE, as the wax is ejecting from the milling process. It is important to let the sheet of wax eject at normal turning speed without pulling on the sheet of wax to help it along. If wax should severely stick to the surface of the mills GREAT CARE MUST BE TAKEN NOT TO DAMAGE THE MILLING SURFACE OF THE ROLLERS, in removing it! The easiest way to remove stuck wax on rollers is to pour boiling water over them and gently brush with a plastic or animal bristle brush until gone. NEVER USE METAL TYPE BRUSHES NO MATTER HOW SOFT YOU THINK THEY ARE TO CLEAN WITH. After cleaning, then seasoning with clean release agent must start again on the stubborn spot.
Prior to milling, the sheets of wax need to be pre-heated to between 90 – 110 degrees F, uniformly throughout. To do this they can be either placed in a thermostat controlled water bath at constant temperature and soaked until warm, or merely placed into a thermostat controlled hot box and left to set until thoroughly warmed. (Note: If working with processed decontaminated wax, choose the warmed water-bath method, because one can not be too sure that full decontamination has been accomplished 100%. Around 1891, it was common practice to soak dipping boards in brine water for a few hours, the proportion of salt in the water being about a teacupful to about three pails of water. The salt served a double purpose: It acted somewhat as a lubricant in facilitating the removal of the sheets from the dipping boards, and as a preventive against the grain rising in the board and consequently, roughening. In the warmed water-bath method, back then also briny water of about 110 degrees F was used to soak and warm the sheets for milling.
Considering decontamination today, this might be an old practice worth following because an alkaline solution is used to hydrolyze coumaphos over time and briny water is alkaline! Thus after decontaminating in the Kelly wax press and photo degrading in UV rays of the sun, foundation making could continue the process by briny water bath by both dipping to sheet wax and soaking to warm prior to milling to make foundation.) While the sheets or stacks of wax are warming, the room you are milling in should be heated to a minimum of 80 degrees F (90 degrees F being much better) to allow for rolling and embossing the foundation, without fighting the wax trying to cool too quickly, once removed from the either the warm water-bath or the hot-box it is being stored in, until milling actually takes place. Just prior to beginning milling, take boiling water and pour it over the mill rollers to pre-heat them up, so that you will not have warm sheets of wax meeting cold rollers to create a big milling mess. You can also pre-heat the rollers by placing a heating-pad around them for a few hours before hand. At any rate the rollers should be pre-heated to about 95 – 100 degrees F prior to beginning to roll wax sheets through the mill rollers.
During milling foundation, make sure the immediate milling area is clean of debris that could end up accidentally adhering to a warmed wax sheet and end-up fed into the foundation mill, only to damage the rolling/embossing surface permanently. Also make sure the gears of the mill (teeth on either end of the embossing rollers) are greased often with a heavy, thick, gear grease, to keep the gears running tight and lessening wear, that over the long haul can effect timing of the gears and the actual impression that is embossed. If you are working with a pre-set spaced foundation mill i.e. Tom’s Mighty Mini Foundation Embosser, plan on obtaining an average of 7 sheets of foundation to the pound for an average 8″ x 16 1/2″ embossed sheet of wax. If you are working with an adjusting foundation mill where you can change the thickness of the wax sheets you are embossing, be very careful not to screw down the mill rollers too much, thus damaging the embossing heads on the foundation rollers
(Note: If the foundation is feeding to one side and not rolling straight through the rollers, before you try to adjust the foundation mill to an adjustment that could make things worse, look at how you are dipping the wax sheets. The ripples or waves of the grain should run 90 degrees to the sides. If the ripples or waves run on the diagonal any way, even 5 – 10 percent, you are holding the dipping board wrong when you are dipping the wax sheets and creating the problem by careless dipping procedures). Stop here then and go back and redo your wax sheets until you learn to do it right! Properly made sheets of wax should feed true and list neither right, nor left, when being fed through the embossing rollers of the foundation mill.
Remember when milling foundation, with every sheet of wax fed, the rollers must be lightly soaped with biodegradable soap suds (that bubbly soap part!). To make an exception is to have the rollers stick wax and then need cleaning. To make plastic sleeves to put the wax sheet in prior to milling to avoid stretching the cells embossed, use plastic garbage baggies 30 x 36 in size, bought from your favorite Grocery Store. Each plastic garbage baggie will make three sleeves. Each sleeve will produce anywhere from 20-40 embossed foundation sheets before needing to be changed, giving an average of 60-100+ sheets embossed before having to use another new garbage baggie at an average cost of 5 cents each divided by 3. Following milling, stack embossed sheets of warm foundation neatly on another board or plate, by layering between sheets of pre-cut paper so that the wax sheets do not stick together. The neater the stacks, the better warmth will be retained within the stack of embossed sheets of wax. The longer the embossed sheets take to cool the greater the ductility of the foundation will be for handling later on when wiring into frames and taking to the field.
CUTTING FOUNDATION TO SIZE: Cutting foundation to desired size is not hard. First beekeepers must take a masonite board (1/4) and cut out the desired size they wish to have foundation made into, i.e. 8″ x 16 1/2″, 4″ x 16 1/2″, etc., to use as a template to cut foundation with. Beekeepers will also need a flat-wooden top cutting station or cutting board to place the foundation and template upon while cutting wax embossed sheets to size. Then take a sponge and soak it into some of the mild soap solution on hand, and wet the cutting board before placing milled foundation sheet of wax to be sized upon it. Then place template over the milled foundation sheet and align the sides of the template along the rows of cells milled on the foundation and cut straight rows.
Cut wax using the pizza cutter, also pre-dipped into soapy solution, prior to starting. (Make sure room you are cutting in is pre-warmed to about 80 degrees F and wax is also of similar temperature to allow for easy and quick cutting.) Then re-dip as needed to avoid sticking. (Note: Try not to cut foundation with rows of cells aligned on a diagonal, as bees could have a tendency to draw the cells out wrong, i.e. drone or hodgepodge pattern.) Save scraps, wash, then re-melt in wax melting pot to make more wax sheets for foundation. When finished cutting foundation, box and seal, storing for future use until needed.
–
Signed: Dee A. Lusby, Amado, Arizona, USA